Monday, April 25, 2011

Machine Capstone Project

Brainstorming Ideas: Here are a few brainstorming sketches; ideas of ways to approach the project.

The first is a bucket of all the marbles on a movable track that can dump each marble into its specific cup. Marbles are differentiated using a photoresistor near the bottom of the bucket where the marbles come out.

The second is a size separator where the marbles roll down a track and each falls into a different hole based on their size.


The third is a motor gate design, where each marble goes down the track separately and a gate guides it into its respective box. This was the design we were able to be successful with.

The fourth is a pneumatic gate design, exactly like the motor gate design, but using pneumatics instead of motors. Pneumatics is a motor system that uses air powered moving air instead of electricity for power. We chose this design originally, but switched to the motor design when we discovered there weren't enough parts for each group to do a pneumatic motor design.

Decision Matrix: Evaluate the four solution ideas using a decision matrix. Determine the best solution to the problem. Final Design Solution: See the blog post titled "Pneumatic Design" for a picture of our pneumatic design.


Design Modifications: At first, we were trying to make a gate system with all pneumatics, but because the whole class was trying to do that as well, it was extremely difficult to find enough parts for everyone. We discovered that we could get the same linear motion job done with motors, so we switched our whole project to this. An exception to the pneumatic requirement was made for our group because of this learning process we went through.


Final Design:

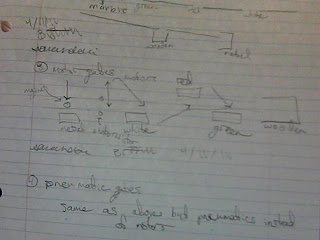
Our first picture is a where the marbles start-going over the magnet. This picks up the metal marbles and the adjacent gate pushes them into the basket. The marbles that aren't metal continue to roll into the gate, where the light and photoresistor examine them and give the reading to our program.


Next, the program pushes out the right gate for the marble it has read and the gate that is holding the marble opens. The marble then slides right into the basket, guided by the just opened gate.


Lastly, the wooden marbles roll into a basket at the end, as the program does not open a gate for them.


This is a shot of our project as a whole. The red walls are used to guide the marbles from falling off the track.


Our programs are shown above and below. Above is the cascading sequence (a subprogram) that decides which gate to open after the photoresistor has done its reading. Below is the main program that refers to the subprogram, called "pushers".

  • Reflection: We successfully a machine that differentiated between five types of marbles.
  • Our model went through multiple prototypes.
  • As explained earlier, there were not enough parts for us to use pneumatics, so we switched to motors. These turned out to be easier to program.
  • A problem we ran into was that the color sensor we used was very sensitive and seemed to vary its readings from day to day. Before each use we had to test our values and adjust accordingly, but the design worked quite well after the adjustments.
  • Our other dilemma was getting it below 2 minutes. The machine we designed sorted 15 marbles in approximately 2 minutes and 25 seconds. We were given an exception for this, because motors work slower than pneumatics.
  • Regarding our programming, we made a main program with a singular subprogram imbedded in it, as mentioned above. It was a challenge to program because neither of us had ever made such an intricate program before but we received help from both David Cuban and Austin VonPohle and were able to make a working program. Overall, we believe that we succeeded in making a working program with a efficient machine.

Tuesday, March 22, 2011

Pneumatic Design


This is our marble with numatics. There are not enough parts so we are going to change the numatics out for motors.

Thursday, March 3, 2011

Please Regrade These

Tennis Ball Game
Survival at Sea
Content is King -- link to class blog and extra credit?
3.1.1
3.1.7
Robopro 2- subprogram

*** I added pictures to every blog post that didn't previously have them.

Tuesday, March 1, 2011

Robopro Subprogram


This is a manipulation of the first Robopro post. We have now used the subprogram feature to accomplish the same task as before. The first picture is the main program while the second is our subprogram, which should look similar to the first Robopro post.


Monday, February 28, 2011

Machine Control Design 3.1.7 Part 1


This project asks us to make a machine of our choice. We chose the project where we are asked to make a machine that drops a chocolate chip onto a cookie. We chose this because it had the lowest level of software difficulty and we understand our strengths and weaknesses and we are not good at programming. We are however, decent at building contraptions because of what we learned during the first semester.


As we are taking initiative and making up the project we failed to complete in class at home, our team members solely include myself and Sarah Dobi. We are working on this project completely equally and both of us are each other's MVP. :)


Here are our two brainstorming possible solution sketches and our programing flowcharts, one is for the dropper and the other is for the conveyor belt.


Conclusion


1. What was the most difficult part of the problem? The most difficult part of the problem was the construction of our ideas because we had to use our creativity to construct a project out of nothing but commonplace household items.


2. List and describe two features that were not part of the design problem that could be addedd to improve your design. One device we could add would put each cookie individually into the packaging. Another innovation we could add would make the dropping device more claw-like and therefore more precise.

Tuesday, February 22, 2011

RoboPro Incrementing Variable Program


This is a basic program we created in RoboPro in class today. We discovered how to create an incrementing variable and control the start and stop of the program based on the variable's number.

To view a larger version of the image, simply click on it.